Elements of the Chartist Window
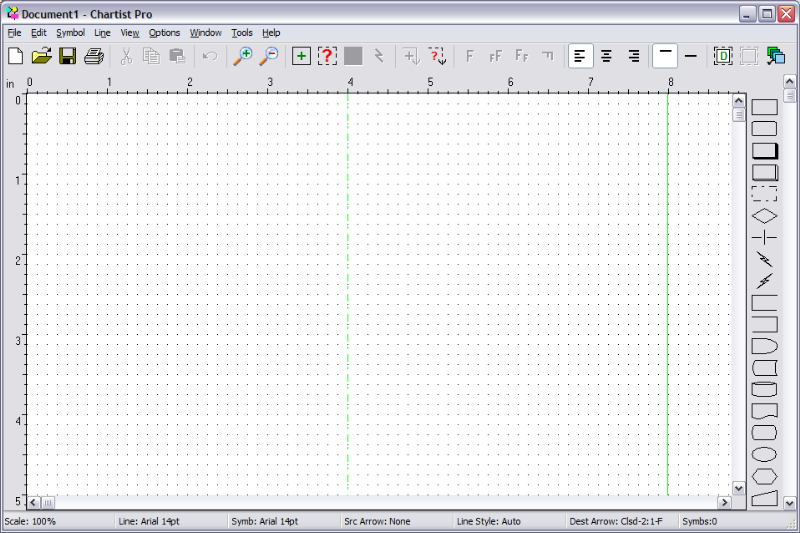
Figure 3-1
The Chartist Main Window
Title Bar
The Chartist Title Bar is located at the top of the main window. It contains the name of the application and the file name of the current document.
Also in the Title Bar are the System Menu button at the left, and the Minimize and Maximize buttons at the right. These buttons operate in the standard manner.
Menu Bar
The menu bar contains all of the commands for using Chartist. This menu bar operates in the standard manner, with the mouse or with the keyboard by pressing the menu key (F10).
Menu Bar Help
After you pull down a menu you can highlight a command with the arrow keys and press F1 to get help on that menu item. This will activate the Windows Help System and display information on the menu item.
Hint: If you want to refer to Help often as you become familiar with Chartist, leave the Help Window open. This will greatly improve the speed of referring to Help from Chartist.
Each of the menu commands is described in Chapter 9: Commands Summary.
Tool Bar
The Tool Bar is located beneath the Menu Bar. It contains short-cut buttons to activate frequently used commands. The Tool Bar buttons are described along with the Menu commands in Chapter 9: Commands Summary.
The Tool Bar is visible when the View Tool Bar command is checked.
Ruler
The ruler runs along the top and left edges of the chart document. The measurements begin at the top left corner of the chart. Dimensions are in inches or centimeters, depending upon the Options Chart... settings.
The ruler is visible when the View Ruler command is checked.
Shape Palette
The Shape Palette is visible along the right hand side of the Chartist Window when the View Shape Palette command is checked. This palette contains the shapes from the current shape library, and provides a quick way to add symbols of different shapes. See Adding Symbols in Chapter 4.
Client Area
The document is shown in the client area of the main window. A Chartist document covers one or more sheets of printer paper. The boundaries of each sheet covered by the document are drawn with a solid green line. The center lines of each sheet are drawn with dot-dash lines.
Grid Points
Grid points are shown as black dots in the main window. Grid points do not show in the Clipboard, nor when the document is printed. The spacing between grid points may be set from the Options Chart... command.
When the Options Snap to Grid command is checked, all points selected by the user are snapped to the nearest whole grid interval.
Grid points are drawn when the View Grid command is checked unless the current display scale is too small to make them distinguishable.
Scaling
The size of the display is normally shown "full scale." Because the actual screen size of some displays may be different from the nominal size known to Windows, full scale may be slightly different from a true 1/1 scaling. Printers generally are accurate in scaling.
Zooming
The client area may be zoomed with the View Zoom Out Zoom In, Normal commands, changing the scale so that more or less of the document may be seen at a time. Zooming takes place in discrete steps, each step out representing about a 3/4 reduction in scale. Zooming has no effect on the printed size of the document or on the size of areas placed into the Clipboard. Refer to the Commands chapter for more information on Zooming.
Scroll Bars
Along the right side of the main window is a vertical scroll bar, and along the bottom of the main window is the horizontal scroll bar. These may be operated with the mouse, to change what part of the document you can see.
Scroll Buttons
Clicking the down button on the vertical scroll bar scrolls the document up (and the viewing area down) by a small amount. Similarly, clicking the up button scrolls the document down. The scroll buttons on the horizontal scroll bar work the same way.
Scroll Thumb
On each scroll bar, the rectangular unlabeled button in between the scroll buttons is called the "thumb." It serves two purposes. It indicates a how far the document is scrolled, and it allows you to "drag" the position of the document directly.
To operate the thumb, click on it and hold down the left mouse button, then drag the thumb in the desired scrolling direction. When you release the button, the document will be redrawn in the new position. The document does not change until you release the thumb.
Page Bars
The area of each scroll bar between the thumb and the scroll buttons is sensitive to the mouse as well. Clicking on the bar between the thumb and a scroll button moves the document by 1/2 the window.