Adding A Line
A line may be added between two different symbols. The exit and entry points for the line are determined by how you designate the start and stop points. A line will exit the attachment point and side of the symbol nearest the initial drawing point. Similarly, a line will enter the attachment point and side of the symbol nearest the final drawing point.
Click on the ![]() Tool Bar button, press Tab, or choose
the Line Add command. You may also use the right
mouse button to add a line. Click and hold the button
with the cursor inside the source symbol, and near the
desired exit attachment point and side. Drag a line to
the destination symbol stopping inside the symbol near the
the desired entry attachment point and side. See Figure
5-1. Release the button to complete the operation. The line
will be routed automatically.
Tool Bar button, press Tab, or choose
the Line Add command. You may also use the right
mouse button to add a line. Click and hold the button
with the cursor inside the source symbol, and near the
desired exit attachment point and side. Drag a line to
the destination symbol stopping inside the symbol near the
the desired entry attachment point and side. See Figure
5-1. Release the button to complete the operation. The line
will be routed automatically.
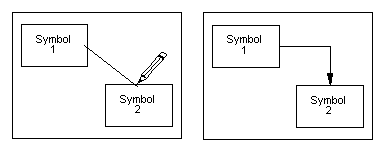
Figure 5-1
Adding A Line
The attachment points for lines on symbols can be made visible by checking the View Line Attach Points command. The number of line attachment points on symbols is chosen with the Options Line Attach Points... command. There may be 1, 3, or 7 attachment points on each symbol side. Refer to Chapter 7: Options.
Routing Lines
Line routing takes place automatically after any change to the chart that affects the layout of lines.
The routing process is denoted by the R cursor. Only those lines that need new route calculations are processed. Routing can take significant time when a large chart is first loaded and all line routes have to be calculated.
After any routing failure, the offending line is shown as a thick red direct line, but the line is not deleted automatically. The user can delete the line, add a waypoint, or rearrange the chart so the line will route.